
Classrooms
Fisher-Bennett Hall Classroom AV Guide Equipment Overview
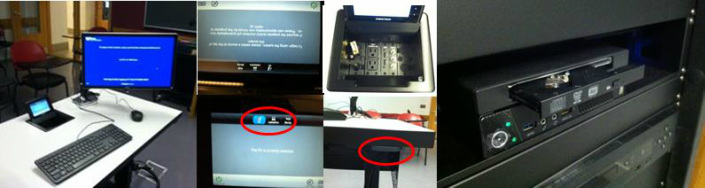
Equipment Overview
Adjustable table with touch screen controls
Projector and screen
A rack containing a networked computer hard drive
The Table
Equipment Overview
Adjustable table with touch screen controls
Projector and screen
A rack containing a networked computer hard drive
- with USB ports
- with CD/DVD player
The Table
- Can be raised and lowered with the black switch beneath table on right side; the switch beneath the table on the left "locks" the table)
- Small screen in center of table has touch screen controls (select source [PC, laptop, Blu-ray], power on/off projector, mute audio/projector)
- Keyboard and mouse
- Laptop VGA connector, Internet connector, USB, and electric outlets are stored in the top/back center compartment of the table.
HOT TIPS!
Touch VIDEO on the small screen to hide what's on the PC screen from the students.
Touch VIDEO again to show what's on the screen to the students.
Touch AUDIO to mute the audio.
Touch AUDIO again to cancel muting.
The Screen, Projector, and Lighting
- Pull the cord to raise and lower the projection screen. (In some classrooms, small wall switches also raise and lower the screen.)
- Light switches (by the entrance door) allow you to have lights off above the screen, but leave lights on above students.
Playing CDs and DVDs
- CDs, DVDs should be played through the computer.
- Volume adjustment is controlled through the computer (lower right corner of the computer screen). The computer screen is not a touch screen!
- There are audio and video mute tabs on the lower right of the small touch screen built into the table. These will turn red when muted.
HOT TIP!
If something is not playing, check to see if the AUDIO is muted.
Also check that the PC is chosen and not the Laptop.
OTHER DEVICES
Memory Sticks (Flash/USB-stick)
- Log on to the computer with your PennKey and password.
- Plug memory stick into one of the two USB ports on the face of the computer hard drive in the rack on the wall or into one of the two USB ports in the compartment on the table.
- On the computer screen, click on ‘My Computer’ icon. Look under ‘Devices with Removable Storage’ and select the memory stick.
- To remove safely, close all documents, click on the green arrow and stop the drive.
- Don’t forget to log off when you’re done.
- Touch LAPTOP tab on the top center of the small touch screen on the table.
- Remove the VGA connector and audio cable connector from the compartment and plug them into the laptop.
- Plug in the Internet connector if needed.
- Plug the laptop into the electrical outlet if needed.
TROUBLESHOOTING TIP!
You may need to press a function key on a laptop to get its display up on the screen. Many laptops have a little icon of a TV on one of the function keys. If not, with IBMs it's often F7, HP and Compaqs are often F4, and some machines are F10.
Shutting Down
- If you logged on, remember to log off (Go to the computer’s START menu and select ‘Log off’)
- Touch the ON/OFF button in the lower left of the small touch screen to turn the projector off. This is the only way to turn the projector off.
If you fail to power off, the projector will time out after 4.5 hours. But we can expect longer life from the projector if it’s turned off when not in use. Look up at the projector as you leave the room. Is the bulb still on? If so, you need to power OFF. Please remember to do this at the end of your class to extend bulb life.
Troubleshooting Quick Fixes
System's sleeping? Touch the touch screen to wake it up.
Computer's sleeping? Move the mouse to wake it up.
Something is not playing? Check which device is selected.
No picture? Is Mute Video selected?
System seems confused? Power off, have a coffee, and then, power on and try again.
For immediate help, contact Rich King [email protected] 215-746-3523 or FBH Classroom Tech Support at [email protected] 215-746-3523
